What is DLP 3D Printing?
Imagine being able to create intricate and precise objects, layer by layer, with a technology that combines the speed of digital projection with the detail of high-resolution printing. This is the magic of DLP (Digital Light Processing) 3D printing. Unlike traditional 3D printing methods, which often struggle with fine details and take longer to produce high-quality results, DLP uses a digital projector to flash a single image of each layer across a vat of liquid resin, curing it almost instantly. This method allows for faster print times and incredibly detailed outputs, making it a popular choice for industries where precision is paramount.

Importance of High-Resolution Outputs
High-resolution outputs are not just a luxury—they’re a necessity in fields such as jewelry making, dental prosthetics, and the creation of miniatures. When working with small-scale objects, every tiny detail counts. A high-resolution DLP printer can produce smooth surfaces, crisp edges, and finely detailed features that would be impossible with lower resolution machines. Whether you’re a hobbyist aiming to create the perfect miniature model or a professional crafting custom dental aligners, the quality of your prints can make or break your project.
Unlocking the Full Potential of Your DLP 3D Printer
So, how do you unlock the full potential of your DLP 3D printer to achieve these stunning results? It all starts with understanding your equipment, selecting the right materials, and fine-tuning your setup for optimal performance. In this comprehensive guide, we will walk you through every step of the process, from choosing the best printer and resin to mastering the slicing software and perfecting your post-processing techniques.
Get ready to dive deep into the world of high-resolution DLP 3D printing. By the end of this guide, you’ll be equipped with the knowledge and skills needed to produce exceptional, high-quality prints that meet even the most stringent standards. Let’s get started!
Understanding Your DLP 3D Printer
Diving into the world of DLP 3D printing is like opening a treasure chest of possibilities. To fully harness the power of this technology, it’s crucial to understand the ins and outs of your DLP 3D printer. In this guide, we will break down the components, explain how the technology works, and provide insights on optimizing your setup for the best results.
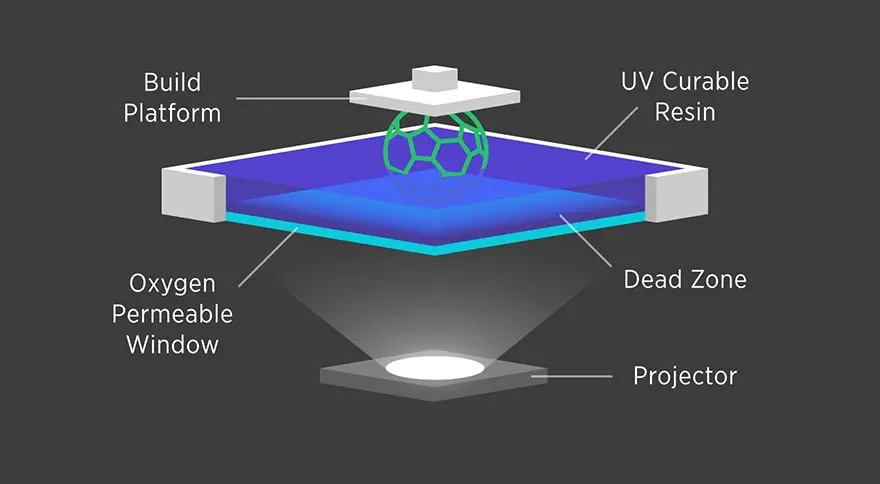
Components of a DLP 3D Printer
To start, let’s take a closer look at the key components that make up a DLP 3D printer. Understanding these parts will help you troubleshoot issues and optimize your printing process.
- Light Source (Projector)
- Function: Projects light to cure the resin layer by layer.
- Importance: The quality and resolution of the projector directly affect the print’s detail and accuracy.
- ResinVat
- Function: Holds the liquid resin that is cured to form the object.
- Importance: Must be kept clean and properly maintained to ensure smooth printing.
- Build Platform
- Function: The surface where the object is built, layer by layer.
- Importance: Needs to be level and properly aligned for accurate prints.
- Control Board
- Function: The brain of the printer, controlling the various components.
- Importance: Ensures coordination between the projector, build platform, and other parts.
Here’s a quick reference table for these components:
| Component | Function | Importance |
| Light Source | Projects light to cure resin | Affects detail and accuracy |
| Resin Vat | Holds liquid resin | Needs to be clean and maintained |
| Build Platform | Surface where object is built | Must be level and aligned |
| Control Board | Controls the printer’s operations | Ensures component coordination |
How DLP Printing Works
Now that you’re familiar with the main components, let’s delve into the actual printing process. Understanding how DLP printing works will help you make informed decisions about your printer settings and troubleshoot any issues that arise.
- Slicing the Model
- Process: The 3D model is sliced into thin layers using specialized software.
- Importance: Proper slicing is crucial for achieving high-resolution prints.
- Projecting Light
- Process: The projector displays an image of each layer onto the resin vat.
- Importance: Accurate projection ensures each layer is correctly formed.
- Curing Resin
- Process: The projected light cures the resin, solidifying it layer by layer.
- Importance: The curing process determines the strength and detail of the print.
- Building Layer by Layer
- Process: The build platform moves up incrementally, allowing new layers to be formed on top of the previous ones.
- Importance: Precise movement ensures that layers are aligned perfectly.
Importance of Each Component in Achieving High Resolution
Each component of your DLP 3D printer plays a vital role in achieving high-resolution outputs. Let’s explore how they contribute to the final print quality:
- Light Source: The resolution of the projector determines the smallest detail your printer can produce. Higher resolution projectors allow for finer details.
- Resin Vat: A clean and well-maintained vat ensures that each layer is cured evenly. Any debris or resin buildup can interfere with the light projection, leading to defects.
- Build Platform: A perfectly level and aligned build platform ensures that each layer is built accurately. Any misalignment can cause layers to shift, resulting in poor print quality.
- Control Board: The control board’s precision in managing the components ensures that the printing process runs smoothly. Any malfunction can lead to print failures.
Optimizing Your DLP 3D Printer Setup
To achieve the best results with your DLP 3D printer, consider the following tips:
- Regular Maintenance: Keep your resin vat clean, your build platform level, and your projector free from dust.
- Quality Resins: Use high-quality resins that are compatible with your printer and suited for high-resolution outputs.
- Fine-Tuning Settings: Experiment with your slicing software settings to find the optimal balance between layer height, exposure time, and support structures.
By understanding the components of your DLP 3D printer and how they work together, you can optimize your setup for high-resolution prints. Stay tuned as we dive deeper into each aspect of the printing process in the next sections. Happy printing!
Choosing the Right Equipment for High-Resolution DLP 3D Printing
Setting up your DLP 3D printer for high-resolution outputs begins with choosing the right equipment. The quality of your printer and the materials you use play a crucial role in determining the final print quality. In this article, we will guide you through the essential considerations for selecting a DLP 3D printer and resin, ensuring you have the best tools for the job.
Selecting the Right DLP Printer
Choosing the right DLP printer can be overwhelming with so many options on the market. Here are the key features to look for:
- Resolution
- Importance: The printer’s resolution, often defined by the pixel size of the projector, determines the level of detail your prints can achieve. A smaller pixel size means higher resolution.
- Recommended Spec: Look for printers with a pixel size of 50 microns or less for high-detail work.
- Build Volume
- Importance: The build volume determines the maximum size of the objects you can print.
- Recommended Spec: Choose a printer with a build volume that suits your typical project sizes. For detailed work, a smaller build volume can often provide higher precision.
- Compatibility with Resins
- Importance: Different printers may have varying compatibility with resin types and brands.
- Recommended Spec: Ensure the printer supports a wide range of resins, especially those designed for high-resolution outputs.
- Ease of Use and Maintenance
- Importance: A user-friendly printer with easy maintenance procedures will save you time and hassle.
- Recommended Spec: Look for features like auto-calibration, easy resin vat cleaning, and a robust support community.
Here’s a quick reference table for these features:
| Feature | Importance | Recommended Spec |
| Resolution | Determines level of detail | Pixel size of 50 microns or less |
| Build Volume | Maximum size of printable objects | Depends on typical project sizes |
| Compatibility with Resins | Supports a wide range of resin types | Supports high-resolution resins |
| Ease of Use and Maintenance | Saves time and hassle | Auto-calibration, easy cleaning |
Recommended Models for High-Resolution Printing
To help you get started, here are a few DLP 3D printers known for their high-resolution capabilities:
Anycubic Photon Mono X
- Resolution: 50 μm
- Build Volume: 192 x 120 x 245 mm
- Highlights: Affordable, reliable, large build volume


Elegoo Mars 3
- Resolution: 35 μm
- Build Volume: 143 x 90 x 165 mm
- Highlights: High precision, user-friendly, compact design
Phrozen Sonic Mini 4K
- Resolution: 35 μm
- Build Volume: 134 x 75 x 130 mm
- Highlights: Ultra-high resolution, fast printing, affordable


SuperMaker DM200
- Resolution: 50 μm
- Build Volume: 192 x 108 x120 mm
- Highlights: Industrial grade, fast, bulk printing, 99% success rate
Choosing the Right Resin
The choice of resin is as important as the printer itself. Here’s what you need to consider:
- Types of Resins Available
- Standard Resins: Good for general purposes but may lack fine detail.
- High-Detail Resins: Designed for precision and fine details, ideal for miniatures and intricate designs.
- Flexible Resins: Useful for parts that need to bend without breaking.
- Functional Resins: Includes resins with specific properties like high strength, temperature resistance, or biocompatibility.
- Factors Affecting Resin Choice
- Print Quality: Higher-quality resins produce smoother surfaces and finer details.
- Durability: Some resins are more durable than others, making them suitable for functional parts.
- Application: Choose resins based on the specific requirements of your project (e.g., dental, jewelry, prototypes).
- Recommended Resins for High-Resolution Outputs
- Elegoo ABS-Like Resin: Known for its smooth finish and fine details, ideal for high-resolution prints.
- Siraya Tech Fast Resin: Offers high detail and durability, great for both prototypes and functional parts.
- Anycubic Plant-Based Resin: Eco-friendly option that doesn’t compromise on detail, suitable for detailed models and miniatures.
Here’s a quick reference table for resin types and their applications:
| Resin Type | Key Features | Best For |
| Standard Resins | General purpose, easy to use | Prototypes, simple models |
| High-Detail Resins | Precision, fine details | Miniatures, intricate designs |
| Flexible Resins | Bendable, resilient | Parts needing flexibility |
| Functional Resins | Specific properties (strength, temperature resistance) | Functional parts, specialized applications |
Optimizing Your Equipment Setup
To get the best results from your DLP printer and resin, follow these optimization tips:
- Calibration: Regularly calibrate your printer’s build platform and projector for consistent results.
- Cleanliness: Keep the resin vat and build platform clean to avoid contamination and print defects.
- Experimentation: Don’t be afraid to experiment with different resins and settings to find what works best for your specific needs.
By carefully selecting the right DLP printer and resin, and optimizing your setup, you can achieve stunning high-resolution prints that meet the most demanding standards. With the right equipment in place, you’re well on your way to creating exceptional 3D printed objects. Stay tuned for our next section, where we’ll discuss how to prepare your 3D model for printing. Happy printing!
Preparing Your 3D Model for High-Resolution DLP Printing
Getting the most out of your DLP 3D printer starts long before you hit the print button. Proper preparation of your 3D model is essential to achieve the high-resolution results you desire. This section will cover the critical steps in designing and slicing your model, ensuring it is optimized for your DLP printer.
Design Considerations
The design phase is crucial for achieving high-quality prints. Here are some key considerations to keep in mind:
- Designing for High Resolution
- Fine Details: Ensure your model includes fine details that your printer can capture. Avoid overly thick walls and bulky structures if your goal is high resolution.
- Smooth Surfaces: Use smooth curves and surfaces in your design software to minimize layer lines in the final print.
- Scale and Proportion: Pay attention to the scale of your model. High-resolution printers are excellent for small, detailed parts, but large models might require segmentation.
- Avoiding Common Design Pitfalls
- Overhangs and Unsupported Structures: Unsupported overhangs can lead to failed prints. Incorporate supports or redesign features to minimize the need for supports.
- Thin Walls and Fragile Parts: Ensure walls and parts are thick enough to withstand the printing process. Thin walls may not print correctly and can be fragile.
- Complex Geometry: While complex designs are possible, they often require additional support and careful slicing. Simplify where possible without compromising the model’s integrity.
Here’s a quick checklist for designing your model:
| Design Aspect | Consideration | Tip |
| Fine Details | Ensure high-detail features | Use a high-resolution design software |
| Smooth Surfaces | Minimize layer lines | Use smooth curves and surfaces |
| Scale and Proportion | Fit within printer’s capabilities | Adjust scale for small, detailed parts |
| Overhangs | Avoid or minimize unsupported structures | Use supports or redesign features |
| Thin Walls | Ensure adequate thickness | Check minimum wall thickness for your printer |
| Complex Geometry | Simplify without losing integrity | Break down complex parts if necessary |
Slicing Software Settings
Slicing your model correctly is just as important as designing it. The slicing software translates your 3D model into instructions your printer can follow, so getting these settings right is crucial.
- Importance of Proper Slicing
- Layer Height: Determines the thickness of each layer. Smaller layer heights result in higher resolution but longer print times.
- Exposure Time: The time each layer is exposed to light. Correct exposure ensures proper curing and layer adhesion.
- Support Structures: Provide stability during printing. Properly placed supports can prevent sagging and warping.
- Recommended Slicing Software
- Chitubox: A popular choice for many DLP printers, offering a range of advanced settings for fine-tuning.
- Lychee Slicer: Known for its user-friendly interface and powerful features, great for beginners and experts alike.
- PrusaSlicer: Offers detailed control over settings and is regularly updated with new features.
- Key Slicing Parameters to Optimize
- Layer Height: For high-resolution prints, set layer height between 25 to 50 microns.
- Bottom Layer Count: Increase the number of bottom layers to improve adhesion to the build platform.
- Exposure Time: Adjust exposure times based on your resin’s specifications. Too much exposure can cause over-curing, while too little can result in weak prints.
- Support Density and Placement: Use automatic support generation but manually adjust where necessary to ensure critical areas are supported without obscuring fine details.
Here’s a table summarizing these key slicing parameters:
| Parameter | Importance | Recommended Setting |
| Layer Height | Affects resolution and print time | 25-50 microns |
| Bottom Layer Count | Improves adhesion | 5-8 layers |
| Exposure Time | Ensures proper curing | Adjust based on resin specs (e.g., 8-12 seconds) |
| Support Density | Provides stability | Medium density, manual adjustments for critical areas |
Practical Tips for Slicing
- Test Prints: Start with small test prints to fine-tune your settings before committing to larger, more complex models.
- Resin Profiles: Save profiles for different resins in your slicing software to streamline the process and ensure consistency.
- Manual Support Adjustments: Use the slicer’s preview mode to check for potential problem areas and adjust supports accordingly.
By carefully designing your model and optimizing your slicing settings, you set the foundation for high-resolution prints. Taking the time to refine these steps will pay off in the quality and precision of your final product. Next, we’ll move on to the critical setup procedures for your DLP printer to ensure everything is ready for a successful print. Stay tuned!
Setting Up Your DLP Printer
Setting up your DLP 3D printer correctly is a crucial step in achieving high-resolution prints. This process involves calibration, resin preparation, and ensuring all components are properly aligned and ready for use. In this article, we’ll walk you through the detailed steps required to set up your DLP printer for optimal performance.
Printer Calibration
Calibration ensures that your printer’s build platform is level and the light source is properly aligned, which is essential for producing high-quality prints. Here’s how to calibrate your DLP printer:
- Calibrating the Build Platform
- Leveling the Platform:
- Home the Z-Axis: Use your printer’s control panel to move the build platform to its home position.
- Loosen the Screws: Slightly loosen the screws that hold the build platform in place.
- Place a Piece of Paper: Insert a piece of paper between the build platform and the resin vat.
- Lower the Platform: Carefully lower the platform until it presses lightly against the paper.
- Tighten the Screws: While maintaining the paper’s slight resistance, tighten the screws to lock the platform in place.
- Zeroing the Platform:
- Set the Zero Point: Use the printer’s software to set the current position as the zero point for the Z-axis.
- Verify Leveling: Perform a test print to ensure the platform is level. Adjust if necessary.
- Leveling the Platform:
- Calibrating the Light Source
- Focus and Alignment:
- Access the Projector: Open the printer’s housing to access the projector.
- Check Focus: Adjust the projector’s focus to ensure the projected image is sharp.
- Align the Image: Ensure the projected image is centered and properly aligned with the build area.
- Focus and Alignment:
Resin Preparation
Proper resin preparation is essential for achieving consistent and high-quality prints. Here’s how to prepare your resin:
- Mixing the Resin
- Shake the Bottle: Shake the resin bottle thoroughly to ensure even distribution of pigments and additives.
- Stirring: Use a stir stick to mix the resin in the vat before each print, especially if it has been sitting for a while.
- Proper Resin Handling and Storage
- Handling: Wear gloves and safety glasses when handling resin to avoid skin contact and eye irritation.
- Storage: Store resin in a cool, dark place, tightly sealed to prevent exposure to light and air, which can degrade its quality.
- Pouring and Filling the Resin Vat
- Clean the Vat: Ensure the resin vat is clean and free from any cured resin debris.
- Pour Slowly: Pour the resin slowly into the vat to avoid creating bubbles, which can affect print quality.
- Check the Level: Ensure the resin level is within the recommended range for your printer model.
Step-by-Step Resin Preparation Checklist:
| Step | Procedure | Importance |
| Mixing the Resin | Shake bottle, stir in vat | Ensures uniform consistency |
| Proper Handling | Wear gloves and safety glasses | Prevents skin contact and irritation |
| Storage | Store in cool, dark place, tightly sealed | Maintains resin quality |
| Pouring Resin | Pour slowly, check for bubbles | Avoids air bubbles, ensures smooth printing |
| Checking Resin Level | Ensure level is within recommended range | Proper resin amount for consistent printing |
By thoroughly calibrating your printer, preparing your resin, and maintaining optimal conditions, you can set up your DLP 3D printer for high-resolution outputs. These steps ensure that your printer operates at its best, producing detailed and accurate prints every time. Next, we’ll dive into the actual printing process, including monitoring your print and handling post-print procedures. Stay tuned for more insights on achieving the best possible results with your DLP 3D printer. Happy printing!
Printing Process
With your DLP 3D printer set up and ready to go, it’s time to move on to the actual printing process. This stage involves starting the print, monitoring its progress, and handling the post-print procedures to ensure your final product is of the highest quality. In this article, we’ll cover each step in detail to help you achieve the best results.
Starting the Print
Starting a print involves loading your prepared model and ensuring that all settings are correct. Here’s how to do it:
- Loading the Sliced File
- Transfer the File: Use a USB drive, SD card, or direct connection to transfer the sliced file to your printer.
- Select the File: Navigate through your printer’s interface to select the loaded file for printing.
- Checking and Confirming Settings
- Review Print Settings: Double-check the key settings (layer height, exposure time, supports) in the printer’s interface.
- Verify Resin Level: Ensure that there is enough resin in the vat to complete the print.
- Starting the Print Job
- Begin Printing: Once everything is confirmed, start the print job through your printer’s control panel.
- Monitor Initial Layers: Pay close attention to the first few layers to ensure proper adhesion to the build platform.
Monitoring the Print
Keeping an eye on the print as it progresses is crucial for catching issues early and ensuring a successful outcome. Here’s what to look for:
- Signs of Successful Printing
- Layer Adhesion: Check that each new layer is adhering properly to the previous layer.
- Smooth Surface: Ensure that the surface of each layer looks smooth and consistent.
- Stable Supports: Verify that the supports are forming correctly and providing the necessary stability.
- Identifying and Troubleshooting Common Issues
- Layer Separation: If you notice gaps or layers not sticking together, it may be due to incorrect exposure times or resin issues.
- Failed Prints: If the print detaches from the build platform or breaks during printing, check the leveling and adhesion settings.
- Surface Defects: Rough surfaces or artifacts can result from dirty resin, incorrect exposure times, or software slicing errors.
Post-Print Handling
After your print is complete, there are several steps to finalize your project. These include removing the print from the build platform, cleaning, curing, and post-processing.
- Removing the Print from the Build Platform
- Detach Carefully: Use a spatula or scraper to gently remove the print from the build platform, taking care not to damage the model.
- Avoid Damage: If the print is difficult to remove, consider heating the build platform slightly to make the process easier.
- Cleaning the Print
- Isopropyl Alcohol (IPA): Submerge the print in a container of IPA to remove any uncured resin. Use a soft brush to gently clean intricate details.
- Rinsing: After the IPA bath, rinse the print with clean water and dry it thoroughly.
- Curing the Print
- UV Curing: Place the print in a UV curing chamber to fully harden the resin. Follow the resin manufacturer’s recommended curing time.
- Sunlight: If you don’t have a curing chamber, you can also use natural sunlight, although this process may take longer.
- Post-Processing Tips for High-Resolution Finishes
- Sanding and Polishing: For a smooth finish, use fine-grit sandpaper to gently sand the surface. Follow with a polishing compound if necessary.
- Painting and Coating: If your model requires painting, apply a primer first to ensure the paint adheres well. Use thin layers of paint to maintain details.
- Detail Enhancements: For models requiring additional detail, consider adding small decals, textures, or other enhancements after curing.
Practical Tips for a Successful Printing Process
- Regular Monitoring: Check on the print periodically, especially during the initial layers, to catch any issues early.
- Consistent Environment: Maintain a stable temperature and low humidity in your printing area to ensure consistent print quality.
- Post-Print Care: Handle the printed model carefully during cleaning and curing to avoid breaking delicate parts.
By following these steps and tips, you can optimize the printing process and achieve high-resolution outputs with your DLP 3D printer. Proper preparation, monitoring, and post-print handling are key to producing exceptional prints. Next, we’ll explore troubleshooting common issues and maintaining your printer to keep it running smoothly. Happy printing!
Troubleshooting and Maintenance
Even with meticulous preparation and careful monitoring, issues can arise during the 3D printing process. Understanding how to troubleshoot common problems and maintain your DLP 3D printer is crucial for consistently producing high-resolution prints. In this article, we’ll cover typical issues, their solutions, and regular maintenance tips to keep your printer in top condition.
Common Printing Issues and Solutions
- Print Artifacts
- Issue: Print artifacts such as layer lines, rough surfaces, or unexpected bumps can appear on your models.
- Causes:
- Layer Shifting: Caused by a loose build platform or vibrations.
- Dirty Resin: Contaminants in the resin vat can interfere with the light projection.
- Exposure Settings: Incorrect exposure time can result in over-curing or under-curing.
- Solutions:
- Layer Shifting: Tighten the build platform and ensure the printer is on a stable surface.
- Dirty Resin: Filter the resin to remove debris and clean the vat regularly.
- Exposure Settings: Adjust exposure times in the slicing software and perform test prints to find the optimal setting.
- Adhesion Problems
- Issue: Prints not sticking to the build platform can lead to failed prints.
- Causes:
- Unleveled Platform: An uneven build platform can prevent proper adhesion.
- Insufficient Exposure: Bottom layers not exposed long enough to adhere properly.
- Resin Issues: Certain resins may require different exposure settings or surface treatments.
- Solutions:
- Unleveled Platform: Recalibrate the build platform to ensure it is level.
- Insufficient Exposure: Increase the exposure time for the bottom layers.
- Resin Issues: Check the resin manufacturer’s guidelines for exposure settings and adjust accordingly.
- Incomplete Prints
- Issue: Parts of the print are missing or broken.
- Causes:
- Support Failures: Inadequate support structures can cause parts of the print to fail.
- Resin Flow Issues: Poor resin flow can prevent certain areas from forming correctly.
- Model Design: Flaws in the 3D model itself.
- Solutions:
- Support Failures: Increase the density or adjust the placement of supports in the slicing software.
- Resin Flow Issues: Ensure the resin vat is filled to the recommended level and stir the resin to maintain consistency.
- Model Design: Review the model for errors and make necessary corrections before slicing.
Regular Maintenance Tips
Consistent maintenance is key to prolonging the life of your DLP 3D printer and ensuring high-quality prints. Here are essential maintenance tasks:
- Cleaning the ResinVat and Build Platform
- Resin Vat: After each print, carefully remove any residual resin and cured pieces from the vat. Clean it with isopropyl alcohol to remove any contaminants.
- Build Platform: Wipe down the build platform with isopropyl alcohol after each print to remove any resin residue and ensure a clean surface for the next print.
- Checking and Replacing Consumables
- FEP Film: Inspect the FEP film at the bottom of the resin vat for scratches or cloudiness. Replace it if it shows signs of wear.
- Resin Filters: Use resin filters to remove any debris from the resin before each print to maintain print quality.
- Updating Firmware and Software
- Firmware Updates: Regularly check the manufacturer’s website for firmware updates to ensure your printer runs smoothly and benefits from the latest features and improvements.
- Slicing Software: Keep your slicing software up-to-date to access new features, improved settings, and bug fixes.
Maintenance Schedule:
| Task | Frequency | Importance |
| Cleaning Resin Vat | After each print | Prevents contamination and ensures print quality |
| Cleaning Build Platform | After each print | Maintains adhesion and surface quality |
| Inspecting/Replacing FEP Film | Monthly or as needed | Ensures clear and consistent light projection |
| Filtering Resin | Before each print | Removes debris, maintains resin quality |
| Updating Firmware/Software | Quarterly or as updates are available | Access to latest features and improvements |
Advanced Maintenance Tips
For those looking to take their maintenance routine to the next level, consider these advanced tips:
- Lubricating Mechanical Parts
- Z-Axis Rod: Apply a small amount of lubricant to the Z-axis rod to ensure smooth movement and reduce wear.
- Checking and Tightening Screws
- Frame and Components: Periodically check all screws and bolts to ensure they are tight and secure. This prevents vibrations and misalignments.
- Environmental Control
- Dust and Debris: Keep the printer in a clean environment to avoid dust buildup on the projector and other sensitive components.
By following these troubleshooting steps and maintenance tips, you can ensure your DLP 3D printer operates at its best, providing high-resolution prints consistently. Regular care and attention to detail will help you avoid common pitfalls and extend the lifespan of your equipment. In the next section, we’ll delve into advanced tips and tricks for optimizing your print settings and achieving the highest possible resolution. Happy printing!
Advanced Tips for High-Resolution DLP Printing
Once you have mastered the basics of setting up and maintaining your DLP 3D printer, you can start exploring advanced techniques to push the boundaries of print quality even further. This section will cover optimization of print settings, using third-party software, and other expert tips to achieve the highest possible resolution in your DLP prints.
Optimizing Print Settings
Fine-tuning your print settings is crucial for achieving exceptional detail and surface quality. Here are some advanced tips for optimizing key settings:
- Layer Height
- Fine Layers: For the highest resolution, use layer heights of 10 to 25 microns. This will result in smoother surfaces and finer details but will increase print time.
- Consistent Layers: Ensure consistent layer thickness to avoid visible layer lines and artifacts.
- Exposure Time
- Precise Control: Adjust exposure times precisely for each resin type. Too much exposure can cause over-curing, leading to loss of detail, while too little can result in weak layers.
- Test Prints: Perform test prints with varying exposure times to find the optimal setting for your specific resin and printer.
- Support Structures
- Custom Supports: Use custom support settings to reduce the impact on fine details. Place supports strategically to avoid contact with delicate areas.
- Support Density: Balance support density to provide adequate stability without obscuring details. Lower density for delicate models, higher for larger, complex prints.
- Anti-Aliasing
- Enable Anti-Aliasing: This feature smooths the edges of each layer, reducing visible pixelation. Experiment with different levels of anti-aliasing to find the best balance between detail and smoothness.
Conclusion
Having a clear understanding and mastery over each step of the DLP 3D printing process is key to achieving high-resolution outputs. From selecting the right equipment to fine-tuning settings and applying advanced techniques, each aspect contributes to the overall quality and success of your prints. In this concluding section, we will summarize the key points discussed and provide final tips and best practices to help you continue producing exceptional 3D prints.
FAQ
To address common questions and concerns, here’s a brief FAQ:
- What’s the difference between DLP and SLA printing?
- DLP uses a digital projector to cure resin, while SLA uses a laser. DLP can often be faster and produce more detailed prints due to its high resolution.
- How often should I clean my resin vat and build platform?
- Clean the vat and platform after every print to prevent resin contamination and ensure consistent print quality.
- Can I mix different types of resins?
- Yes, but ensure they are compatible and mix thoroughly to achieve the desired properties.