
In the realm of 3D printing, Stereolithography (SLA) stands out for its remarkable ability to fabricate intricate and highly detailed models. Whether one is a hobbyist crafting miniatures or a professional engineer prototyping parts, the precision of SLA technology can bring designs to life. However, achieving flawless prints involves more than just the printing process itself; the post-curing stage is equally critical.

Imagine unveiling a freshly printed object only to find it lacks the expected strength and durability. This is where post-curing comes in, transforming prints from mere shapes into robust, functional pieces. Post-curing not only enhances the mechanical properties of prints but also ensures they reach their full potential in terms of aesthetics and performance.
This comprehensive guide delves into the essential steps for post-curing SLA prints. It explores everything from the science of curing to practical techniques that guarantee perfect results. Readers will learn what post-curing is, why it’s crucial, and how to implement best practices to avoid common pitfalls. By the end of this article, readers will be equipped with the knowledge and skills to elevate their SLA printing capabilities, ensuring their creations are exceptional.
Understanding SLA Printing
Stereolithography (SLA) printing is an innovative 3D printing technology that has revolutionized the creation of complex models and prototypes. To fully grasp the significance of post-curing, which will be discussed in depth later, it’s essential to understand the fundamentals of SLA printing. This section covers what SLA printing is, its advantages, and the role of different resins in the process.
What is SLA Printing?
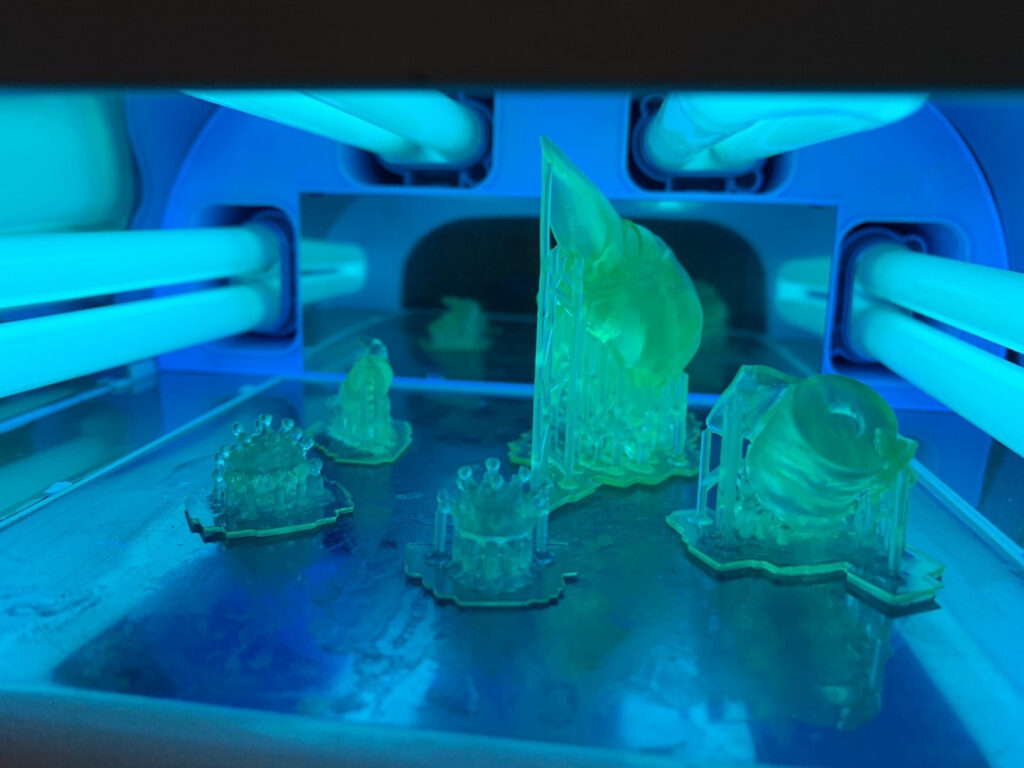
At its core, SLA printing uses a laser to cure liquid resin into hardened plastic. The process starts with a vat of liquid photopolymer resin, which is sensitive to ultraviolet (UV) light. Here’s a simplified breakdown of the SLA printing process:
- Design Creation: A 3D model is created using computer – aided design (CAD) software.
- Layering: The printer uses a UV laser to selectively cure layers of resin, solidifying the material layer by layer.
- Build Platform: As each layer is cured, the build platform moves down to allow fresh resin to flow over the previous layer.
- Completion: This process continues until the entire model is complete.
Advantages of SLA Over Other 3D Printing Methods
SLA printing offers several benefits that distinguish it from other 3D printing technologies like FDM (Fused Deposition Modeling) and SLS (Selective Laser Sintering). Here’s a quick comparison:

| Feature | SLA Printing | FDM | SLS |
| Detail Resolution | High | Moderate | High |
| Surface Finish | Smooth | Rough | Varies |
| Material Variety | Limited (mostly resins) | Wide (thermoplastics) | Limited (powders) |
| Speed | Moderate | Fast | Slow |
| Post – Processing Needs | High | Moderate | Low |
Key Benefits of SLA Printing
Exceptional Detail: SLA printers excel at producing high – resolution prints with intricate details. For example, in jewelry design, the fine details of a delicate filigree can be accurately reproduced. Dental models also benefit from this high – detail capability, allowing for precise dental restorations.
Smooth Surface Finishes: The layer thickness can be as low as 25 microns, resulting in smooth surfaces that often require minimal post – processing. This smoothness is especially important for products where aesthetics matter, such as figurines or consumer electronics parts.
Versatility of Applications: From prototypes to final products, SLA printing is widely used in various industries. In the automotive industry, it can be used to create engine components prototypes. In aerospace, it helps in manufacturing lightweight, complex parts. The healthcare sector uses it for custom – made medical devices, and the art world for creating unique sculptures.
Material Properties: SLA resins can be formulated to possess unique properties. For instance, flexible resins offer rubber – like flexibility and resilience, making them suitable for parts that require bending or compression, such as grips or seals. Transparent resins are useful for creating optical components, and heat – resistant resins can withstand high temperatures, ideal for engineering applications.
The Role of Resins in SLA Printing
Resin lies at the heart of SLA printing. Different types of resin can significantly impact the quality and functionality of the final print. Here’s a closer look at the various types of resins commonly used in SLA printing:
- Standard Resins
- Characteristics: These are suitable for general – purpose applications, offering a balance between strength and detail.
- Usage: They are often used for prototyping and visualization models. For example, when creating a concept model of a new product, standard resins can quickly bring the design to life.
- Durable Resins
- Characteristics: Resilient and impact – resistant, making them suitable for functional parts.
- Usage: They are used for functional prototypes and end – use parts. In a manufacturing setting, durable resin can be used to create jigs and fixtures that need to withstand repeated use.
- Flexible Resins
- Characteristics: Offer rubber – like flexibility and resilience.
- Usage: Ideal for parts that require bending or compression, like grips on tools or seals in mechanical devices.
- Castable Resins
- Characteristics: Burn out cleanly for metal casting without residue.
- Usage: Commonly used in jewelry and investment casting. For example, in creating a detailed metal jewelry piece, castable resin can be used to make a mold.High – Temperature Resins
- Characteristics: Can withstand high temperatures, making them suitable for engineering applications.
- Usage: Used for parts exposed to heat or requiring thermal stability, such as components in automotive engines or industrial furnaces.
Understanding SLA printing is essential for anyone aiming to maximize their 3D printing experience. The combination of high detail, smooth surface finishes, and versatility makes SLA a preferred choice for many applications. Equally crucial is the selection of the right resin, which can significantly influence the outcome of prints. In the next section, the critical process of post – curing and its significance in enhancing the properties and durability of SLA prints will be explored.
What is Post-Curing?
Once an SLA print is completed, the process doesn’t end there. Post – curing is a crucial step that significantly enhances the quality and durability of the 3D print. This section explores what post – curing is, the science behind it, and why it plays an essential role in the final outcome of SLA prints.
Definition of Post-Curing
Post – curing refers to the additional curing process that occurs after the initial printing phase. While the SLA printer uses a UV laser to solidify the resin layer by layer during printing, post – curing further hardens and stabilizes the resin structure. This step is vital for achieving optimal mechanical properties and ensuring the print can withstand everyday use.
Why is Post-Curing Necessary?
The necessity of post – curing can be attributed to several factors:

Maximizing Strength: During the printing process, not all resin may be fully cured. Post – curing ensures that any uncured material is properly solidified, enhancing the overall strength of the print. For example, a printed mechanical part that may seem complete after printing but could break easily without post – curing becomes much stronger after the additional curing process.
Improving Durability: Post – curing allows the resin to reach its full potential in terms of elasticity, impact resistance, and thermal stability. A print made with a flexible resin will have better flexibility and resilience after proper post – curing.
Enhancing Stability: The molecular structure of the resin can be improved through post – curing, resulting in less warping or deformation over time. This is especially important for large or complex prints that are more prone to warping.
Achieving Desired Finish: A well – executed post – curing process can also improve the appearance of prints, leading to better surface finishes and colors. A printed figurine may have a dull or rough surface before post – curing, but after proper treatment, it can have a smooth, vibrant finish.
The Science Behind Post-Curing
Understanding the science behind post – curing helps in grasping its importance in the printing process. Here’s a deeper look at how post – curing affects the resin material:
Molecular Changes
- Cross – Linking: When UV light is used during post – curing, it causes a chemical reaction known as cross – linking. This process strengthens the bonds between the molecules in the resin, resulting in a more rigid and durable final product. For example, think of the resin molecules as individual strands. Cross – linking is like tying these strands together, making the overall structure stronger.
- Reduction of Residual Monomers: Post – curing helps to further reduce any remaining unreacted monomers in the resin. These uncured materials can cause issues such as sticky surfaces or eventual degradation. A print with a sticky surface due to residual monomers becomes less sticky after post – curing.
Temperature Effects
- Thermal Polymerization: Heat can be used during post – curing to accelerate the curing process. By applying heat, the molecular chains in the resin can move more freely, allowing for better bonding and further curing.
- Temperature Guidelines: While each resin has specific temperature requirements, typically maintaining a curing temperature between 40°C to 60°C (104°F to 140°F) can enhance the curing process without risking damage to the print. If the temperature is too high, it may cause the print to warp or even melt, while too low a temperature may not fully cure the resin.
Post – curing is an indispensable step in the SLA printing process that transforms a raw print into a strong, durable object. It maximizes the material properties and aesthetic appeal of prints while ensuring they are ready for practical applications. With a solid understanding of what post – curing entails, one can take their SLA projects to the next level.
Essential Steps for Post-Curing SLA Prints
Now that the importance of post – curing and the science behind it are understood, it’s time to explore the essential steps for effectively post – curing SLA prints. Proper post – curing not only enhances the durability and strength of prints but also improves their overall appearance. This section covers everything from preparation to execution, ensuring perfect results every time.
Step 1: Preparing the Prints for Post-Curing
Before starting the curing process, it’s crucial to prepare the prints adequately. Proper preparation can prevent issues and ensure the curing process is effective.
Cleaning the Prints
- After printing, SLA prints have excess uncured resin on their surfaces. Cleaning is a vital step to prevent residual material from interfering with the curing process.
- Recommended Cleaning Methods:
- Isopropyl Alcohol (IPA): Use a container filled with 90% or higher isopropyl alcohol. Submerge the print for 5 – 10 minutes to dissolve the excess resin. For example, if you have a small, detailed print, this method can effectively remove the resin from hard – to – reach areas.
- Ultrasonic Cleaners: These devices can clean intricate details more thoroughly. Place the print in a solution of IPA and run the ultrasonic cleaner for 3 – 5 minutes. This is especially useful for prints with complex geometries.
- Air Drying: After cleaning, air dry the prints in a well – ventilated area or use compressed air to remove excess IPA. This step ensures that no IPA residue remains on the print.
Drying the Prints
- Once cleaned, it’s essential to ensure the prints are fully dry before post – curing. Any residual alcohol can affect the curing process.
- Drying Time: Allow the prints to air dry for at least 30 minutes.
- Drying Environment: Use a clean, dust – free environment to prevent contamination. For instance, drying the prints on a clean, flat surface in a dust – free room will ensure that no particles stick to the print during the drying process.
Step 2: Choosing the Right Post-Curing Method
With the prints clean and dry, the next step is selecting an appropriate post – curing method. There are several effective techniques, each with its pros and cons.
Overview of Curing Methods
| Method | Description | Pros | Cons |
| UV Light Curing | Uses UV light to cure the resin. | Efficient and effective. | Requires UV safety precautions. |
| Heat Curing | Involves heating the prints to accelerate curing. | Enhances cross – linking. | Risk of warping if overheated. |
| Combination Method | Uses both UV light and heat for optimal results. | Provides the best results. | More complex setup required. |
Factors to Consider
- Type of Resin: Different resins may respond better to certain curing methods. For example, some flexible resins may cure better with a combination of UV and heat, while standard resins can be effectively cured with UV light alone.
- Print Size and Complexity: Larger or more complex prints may require longer curing times. A large, detailed print may need more time under the UV light or in the heat to ensure even curing.
- Available Equipment: Consider what curing equipment you have, such as UV lamps or curing ovens. If you only have a UV lamp, UV light curing may be the most practical option.
Step 3: Setting Up the Post-Curing Station
Having the right setup is crucial for effective post – curing. Ensure the workspace is safe and well – organized.
Equipment Needed
- UV Lamp or Curing Station: A UV lamp with adjustable settings is essential for curing.
- Heat Source (if applicable): An oven or heat gun for heat curing.
- Protective Gear: Gloves, goggles, and a mask for safety.
Safety Precautions
- UV Protection: Always wear UV – protective eyewear and clothing when operating UV lamps to avoid skin and eye damage.
- Ventilation: Ensure the workspace is well – ventilated, especially when using solvents like IPA or when heating resins. This helps to remove any harmful fumes.
Step 4: The Post-Curing Process
Now that preparations are complete, it’s time to begin the post – curing process. Follow these steps to ensure effective curing:
UV Light Curing Procedure
- Position the Print: Place the cleaned and dried print under the UV lamp.
- Set the Timer: Cure for a recommended duration (typically 3 – 10 minutes, depending on the resin).
- Rotate the Print: If possible, rotate the print halfway through to ensure even exposure. This helps to prevent uneven curing.
Heat Curing Procedure
- Preheat the Oven: Set the oven to the recommended temperature (40°C to 60°C / 104°F to 140°F).
- Place the Print: Carefully place the print on a baking sheet lined with parchment paper.
- Cure: Allow to cure for the recommended time (usually 15 – 30 minutes).
Monitoring the Process
- Check Regularly: Monitor the curing process to prevent over – curing.
- Observe Changes: Look for changes in surface texture or color, which may indicate adequate curing. For example, a print may change from a slightly dull to a shiny finish when it’s properly cured.
With these essential steps, one is well on the way to achieving perfectly cured SLA prints. Proper preparation, careful selection of curing methods, and meticulous execution of the curing process are vital to ensure prints reach their full potential in strength and appearance.
Tips for Achieving Perfect Post-Curing Results
Now that the essential steps for post – curing SLA prints are understood, let’s explore some practical tips and best practices that can help achieve flawless results every time. Effective post – curing can make a significant difference in the quality of the final print, so let’s look at how to maximize the benefits of this critical step.
Understanding Optimal Curing Times
One of the most crucial aspects of post – curing is determining the right curing time for a specific resin and print size. Curing times can greatly influence the final properties of prints, so it’s important to follow some general guidelines.
- Recommended Curing Times
| Resin Type | UV Curing Time | Heat Curing Time |
| Standard Resins | 3 – 5 minutes | 15 – 30 minutes |
| Durable Resins | 5 – 10 minutes | 20 – 30 minutes |
| Flexible Resins | 2 – 5 minutes | 10 – 20 minutes |
| Castable Resins | 5 – 10 minutes | 20 – 30 minutes |
– **Note**: Always refer to the manufacturer’s specifications for the most accurate curing times, as they can vary significantly based on formulation.
Testing and Adjustments
- Test Prints: Conduct small test prints to determine the optimal curing time. This can save time and material in the long run. For example, if you’re using a new batch of resin, printing a small sample first can help you find the right curing time.
- Incremental Increases: If unsure, start with shorter curing times and gradually increase until you achieve the desired result. This way, you can avoid over – curing.
Avoiding Common Post-Curing Mistakes
When post – curing SLA prints, it’s easy to make mistakes that can negatively affect the final product. Here are some common pitfalls to avoid:
Over – Curing
- Issue: Curing for too long can cause prints to become brittle and lose flexibility. For example, a flexible part that’s over – cured may break when bent.
- Solution: Stick to recommended curing times and regularly check prints during the curing process.
Inconsistent Curing
- Issue: Uneven curing can lead to weak spots or deformities in prints. A print with uneven curing may have areas that are not as strong as others.
- Solution: Rotate prints during UV curing and ensure even exposure to light. For heat curing, position prints for optimal air circulation.
Ignoring Resin – Specific Guidelines
- Issue: Each resin type has unique properties and requirements. Using the wrong curing time or temperature for a resin can result in a poor – quality print.
- Solution: Always consult the resin manufacturer’s guidelines for curing times, temperatures, and safety precautions.
Maximizing Post-Curing Efficiency
To make the most of the post – curing process, consider implementing a few strategies to improve efficiency.
- Batch Processing
- Cure Multiple Prints: If you have several prints to cure, it’s more efficient to do them all at once. This saves time as you don’t need to repeatedly set up the curing equipment. For instance, if you’re producing a batch of small figurines, curing them together in a UV curing chamber or oven can significantly reduce the overall curing time.
- Use Curing Stations: If available, utilize a dedicated curing station that allows multiple prints to be cured simultaneously under optimal conditions. Some curing stations are designed with multiple trays or holders, enabling you to cure different prints at the same time without sacrificing curing quality.
- Combine Curing Methods
- Dual Approach: For the best results, consider using both UV light and heat curing. This combination can maximize cross – linking and result in stronger, more durable prints. For example, starting with a short period of UV curing to quickly initiate the curing process and then following it with heat curing to further enhance the cross – linking and ensure a more complete cure.
- Sequential Curing: A sequential curing method can be highly effective. Start with UV curing for a few minutes, which rapidly cures the surface layers of the resin. Then, move on to heat curing to penetrate deeper into the print and complete the curing process throughout the entire object. This way, you can take advantage of the speed of UV curing and the enhanced cross – linking of heat curing.
Post-Curing Maintenance
Once you’ve successfully cured your prints, some maintenance steps can help preserve their quality and performance.
- Proper Storage
- Keep Away from UV Light: Store finished prints in a dark, cool place to prevent unintended curing or degradation over time. UV light can continue to react with the resin even after the initial post – curing, potentially causing the print to become brittle or change color. For example, storing printed parts in a closed cabinet away from sunlight is a good practice.
- Controlled Environment: Avoid high humidity and extreme temperatures that could affect the structural integrity of your prints. High humidity can cause the resin to absorb moisture, which might lead to swelling or weakening of the print. Extreme cold or heat can also cause the print to expand or contract, resulting in warping or cracking.
- Regular Inspection
- Check for Defects: Periodically inspect your finished prints for signs of warping or degradation. This can help you identify any issues early on. For example, if you notice a small crack starting to form in a printed part, you can take steps to prevent it from getting worse, such as reinforcing the area or replacing the part if necessary.
- Surface Treatment: If desired, apply surface treatments or coatings to enhance appearance and durability. A clear coat can make the print look more polished and also provide an extra layer of protection against scratches and environmental factors. Some coatings can also improve the chemical resistance of the print.
By following these tips for optimal post – curing, you can significantly improve the quality and performance of your SLA prints. From understanding curing times and avoiding common mistakes to maximizing efficiency and maintaining your prints, each step plays an important role in achieving exceptional results.
Conclusion: The Importance of Post-Curing in SLA Printing
As we conclude our exploration of post – curing in SLA printing, it’s crucial to reflect on its significance within the entire 3D printing workflow. Post – curing is not an optional step; it is a critical phase that can greatly influence the performance, durability, and aesthetic quality of your final prints. This section summarizes the key points discussed and emphasizes why mastering this process is essential for achieving optimal results in your 3D printing endeavors.
Key Takeaways from Post-Curing
Enhancing Material Properties
- Post – curing is fundamental in ensuring that SLA prints reach their full potential. Effective post – curing leads to:
- Increased Strength: By fully solidifying the resin, prints become stronger and more robust. A printed mechanical component, for example, can withstand greater stress after proper post – curing.
- Improved Durability: The curing process enhances resistance to wear, impact, and environmental factors. Prints made with durable resins can last longer in demanding applications when post – cured correctly.
- Better Dimensional Stability: Properly cured prints are less likely to warp or deform over time. This is especially important for parts with precise dimensions, such as those used in aerospace or medical devices.
The Role of Preparation
- The preparation stage is the foundation for successful post – curing. Proper cleaning, drying, and setup are essential:
- Cleaning: Removing excess uncured resin is vital for the integrity of the final print. Residual resin can prevent proper curing and affect the print’s surface finish.
- Drying: Ensuring prints are thoroughly dried prevents complications during the curing process. Moisture or solvent residue can interfere with the curing reaction.
- Safety Setup: Using protective gear and maintaining a well – ventilated workspace is crucial for personal safety. Handling UV light and heated resins without proper precautions can be hazardous.
Following Best Practices
- Adhering to best practices during the post – curing process is key to maximizing results:
- Optimal Curing Times: Each resin has specific curing requirements. Understanding these can prevent issues like brittleness from over – curing or weak spots from under – curing. For example, flexible resins require shorter curing times compared to durable resins.
- Avoiding Common Mistakes: Being aware of common pitfalls, such as inconsistent curing and ignoring resin specifications, helps in achieving better results. Consistent curing ensures uniform strength and appearance across the print.
Maintenance and Care
- Once prints are cured, long – term care is necessary to maintain their quality:
- Proper Storage: Keeping prints in a controlled environment away from UV light helps preserve their integrity. Storing prints in a dark, cool place can prevent further curing and degradation.
- Regular Inspection: Regularly checking for defects or degradation allows for timely interventions. Early detection of issues like warping or cracking can save the print from further damage.
The Role of Post-Curing in the 3D Printing Workflow
Post – curing serves as the bridge that transforms a raw 3D print into a functional, high – quality product. Incorporating a thorough post – curing process into your workflow unlocks the full potential of SLA printing technology. It takes a simple model and turns it into a durable, impressive object that meets specific needs, whether for prototyping, production, or artistic purposes.
Overall Impact on Print Quality
In summary, post – curing has a significant impact on:
Aesthetics: It results in smoother finishes and more vibrant colors, enhancing the visual appeal of prints. A well – post – cured figurine will have a more polished look compared to one that is not post – cured properly.
Functionality: Improved mechanical properties ensure that prints can withstand their intended use. A printed gear, for example, will be more reliable and long – lasting after post – curing.
Versatility: Well – cured prints can be used across various applications, from industrial parts to intricate jewelry designs. The enhanced durability and performance make them suitable for a wide range of uses.
Final Thoughts
As you continue your journey in the world of SLA printing, remember that mastering post – curing can greatly enhance the quality of your outputs. It’s not just an additional step; it’s an essential process that ensures your models are not only visually appealing but also functional and durable. With the knowledge gained from this guide, you are better equipped to take your 3D printing projects to new heights. Embrace post – curing as a critical part of your workflow and enjoy the satisfaction of producing high – quality, reliable, and beautiful prints. Happy printing!