
In the dynamic landscape of 3D printing, Selective Laser Sintering (SLS) is a revolutionary technology. It transforms the manufacturing and prototyping processes. SLS uses lasers to fuse materials at a microscopic level, enabling the creation of intricate designs and durable parts with a simple click. Whether for hobbyists aiming to materialize their ideas or professionals seeking efficient prototyping solutions, SLS offers remarkable versatility and precision.

SLS 3D printing is a process that uses a laser to sinter powdered materials, such as nylon, metals, or ceramics, layer by layer to form solid structures. This technique can produce complex geometries beyond the reach of traditional manufacturing methods. Its applications span from aerospace components to custom medical devices and are constantly expanding.

This guide comprehensively covers the SLS 3D printing journey. It starts with an in – depth understanding of the SLS process, explores the necessary equipment and materials, and provides guidance on printer setup. It also teaches how to design models tailored to SLS requirements.
The guide includes hands – on projects, from simple functional parts to advanced prototypes, with step – by – step instructions. Additionally, it addresses common issues and troubleshooting strategies. Whether you’re new to SLS 3D printing or an experienced maker, this guide aims to equip you with the knowledge and skills to start your SLS 3D printing projects. So, let’s explore the exciting world of SLS 3D printing!
Getting Started with SLS 3D Printing
Understanding the SLS Process
Selective Laser Sintering (SLS) is a complex yet fascinating 3D printing technique. It uses a high – powered laser to fuse powdered materials into solid objects. Unlike traditional subtractive manufacturing, SLS builds parts layer by layer, facilitating intricate designs and functional prototypes.
How SLS Works: A Step – by – Step Breakdown

- Powder Bed Preparation: A roller spreads a thin layer of powder evenly across the build platform. The layer thickness usually ranges from 0.1 to 0.2 mm.
- Laser Sintering: A CO₂ laser scans the powder bed. It sinters (fuses) the particles according to the 3D model’s cross – section. The laser moves quickly, creating precise and intricate shapes.
- Layering: After sintering a layer, the build platform lowers slightly. Then, a new layer of powder is added on top. This process repeats until the entire object is completed.
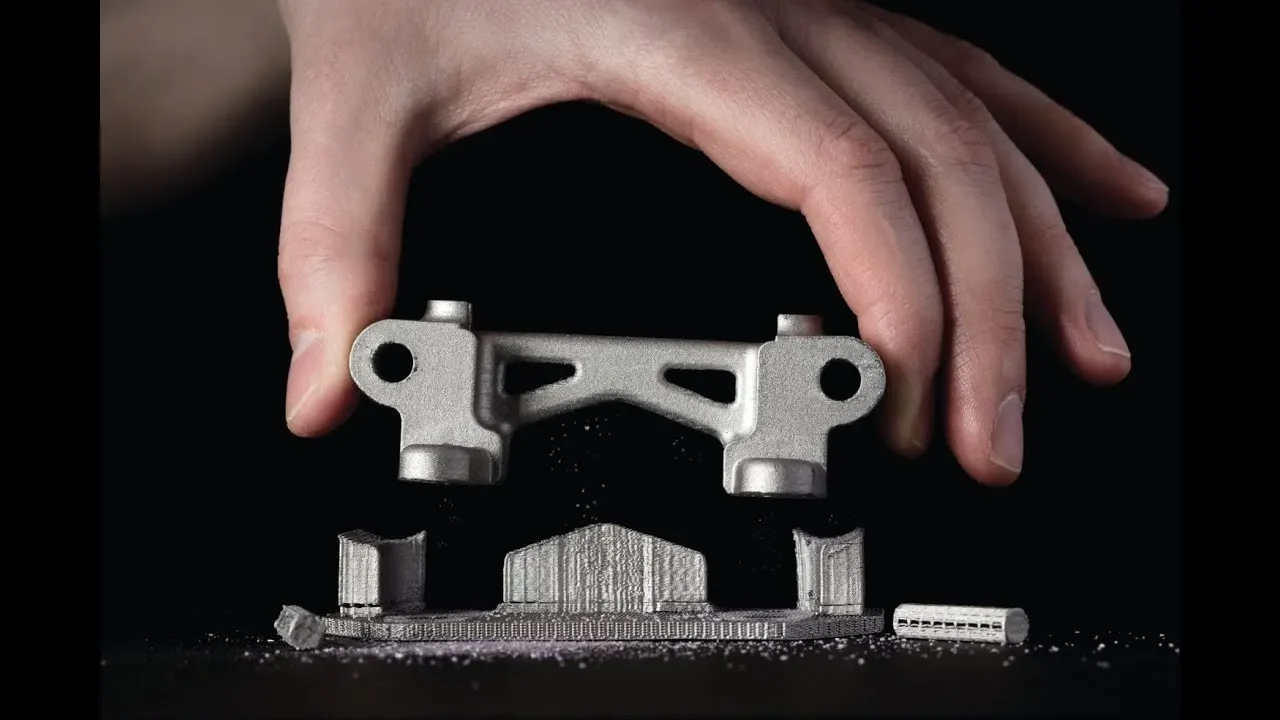
- Cooling and Part Removal: Once the printing is finished, the build chamber cools down. The printed part is removed from the powder bed, and excess powder is brushed away.
Key Benefits of the SLS Process

- Complex Geometries: SLS can create parts with intricate internal structures that traditional manufacturing methods cannot produce. For example, in aerospace, it can manufacture components with complex cooling channels.
- Material Efficiency: Unused powder can often be recycled and reused in future prints, reducing waste.
- Strong and Functional Parts: SLS – printed parts are known for their durability and mechanical strength, making them suitable for functional applications like automotive parts.
Required Equipment and Materials
When starting with SLS 3D printing, having the right equipment and materials is crucial.
Essential Equipment for SLS Printing
| Equipment | Description |
| SLS Printer | A machine specifically designed for SLS printing. |
| Computer | Needed for design and print preparation, equipped with CAD software. |
| Powder Handling Tools | Tools like sifters and spatulas for managing powder. |
| Post – Processing Tools | Tools for cleaning and finishing parts after printing. |
Recommended SLS Printers
- Commercial Options:
- Formlabs Fuse 1: User – friendly and suitable for small to medium – sized prints. For instance, it’s great for hobbyists or small – scale prototyping in a home or office setting.
- EOS P 396: Known for its high precision and large build volume, making it ideal for industrial – scale production.
- Supermaker SLS2030: The best choice for low-cost, high-precision mass production; the machine’s startup cost is the lowest in the industry.
- DIY Options:
- Sintratec Kit: A modular kit that allows users to build their own SLS printer. This is a cost – effective option for those with some technical skills and a desire for customization.
- SLS 3D Printer Plans: Various online resources offer plans for DIY SLS printers.
What Materials Can Be Used in SLS?

SLS printing can use a variety of materials. Here are the most common types of powders:
| Material Type | Properties | Common Applications |
| Nylon (PA12) | Durable, flexible, and lightweight | Functional prototypes, end – use parts. For example, it can be used to print smartphone cases or tool handles. |
| Nylon (PA11) | Biodegradable, good impact resistance | Automotive and industrial applications, like interior automotive parts. |
| Glass – filled Nylon | Increased strength and stiffness | Structural components, such as parts in machinery. |
| Metal Powders | High strength, allows for complex geometries | Aerospace, automotive, and tooling. For instance, metal SLS – printed parts are used in aircraft engines. |
| Ceramics | Heat – resistant and aesthetic finish | Art, dental, and industrial uses, like creating ceramic art pieces or dental crowns. |
Setting Up Your SLS Printer
Once you have your equipment and materials ready, it’s time to set up your SLS printer.
Step – by – Step Guide to Setting Up Your SLS Printer
- Unboxing and Assembly: Carefully unbox your SLS printer and follow the manufacturer’s assembly instructions. Ensure all components are securely attached and properly aligned.
- Software Installation: Install the necessary software for your printer, including slicing software and printer management tools. Familiarize yourself with the interface and available features.
- Calibration: Proper calibration is essential for successful prints. Follow the manufacturer’s guidelines to calibrate your printer. This usually involves adjusting the laser power, bed leveling, and temperature settings.
- Running a Test Print: Before starting a major project, run a test print using a sample file provided by the manufacturer. Analyze the results and make any necessary adjustments to your printer settings.
Designing for SLS 3D Printing: A Comprehensive Guide
Designing for Selective Laser Sintering (SLS) 3D printing requires a combination of creativity and technical knowledge. While SLS offers great design freedom, it also has specific design considerations. Understanding these can prevent issues like warping, weak points, or failed prints. Whether creating functional prototypes, end – use parts, or artistic designs, knowing SLS design nuances saves time, materials, and effort.
Why Design Matters in SLS Printing
Unlike Fused Deposition Modeling (FDM) or Stereolithography (SLA), SLS printing doesn’t need external support structures. The unsintered powder acts as a natural support. However, this doesn’t mean design is without constraints. Poorly designed models can still face problems.
The key to successful SLS design is understanding the technology’s capabilities and limitations and designing accordingly.
The Basics of SLS 3D Model Design
1. Choosing the Right CAD Software
To design for SLS, you need a reliable Computer – Aided Design (CAD) tool for precise modeling. Here are some popular options:
| Software | Features | Skill Level |
| Fusion 360 | Parametric modeling, simulation tools, and file exporting | Beginner to Advanced. It’s suitable for users who want to explore various design aspects, from basic modeling to complex simulations. |
| SolidWorks | Industry – standard with advanced engineering capabilities | Intermediate to Expert. This software is widely used in the engineering and manufacturing industries for its in – depth features. |
| TinkerCAD | Simple, browser – based tool for quick designs | Beginner. Ideal for those new to CAD, it provides an easy – to – use interface for basic designs. |
| Blender | Great for organic, artistic designs and freeform modeling | Intermediate. It’s a powerful tool for creating unique, non – geometric designs. |
Choose software based on your project complexity and skill level. If new to CAD, start with simpler tools like TinkerCAD and then move on to more advanced ones like Fusion 360.
2. File Formats and Exporting for SLS
When preparing your design for SLS printing, export your model in a format compatible with the printer’s slicing software. Common formats include:
- STL (Standard Tessellation Language): The most widely used format, suitable for most SLS printers.
- OBJ: Supports color and texture data, useful for aesthetic models.
- 3MF: A newer format offering more detailed metadata and better support for complex geometries.
Before exporting, ensure the model is watertight (no gaps or holes in the mesh) and properly scaled to the intended size.
Design Guidelines for SLS Printing
Designing for SLS requires following specific guidelines for successful prints.
1. Wall Thickness
- Minimum Wall Thickness: SLS printing needs a minimum wall thickness for structural integrity. For most materials, aim for 0.7 – 1.0 mm. Thinner walls may warp or break during post – processing.
- Uniform Wall Thickness: Avoid sudden changes in wall thickness, as they can cause stress concentrations and warping.
2. Overhangs and Unsupported Features
Since SLS doesn’t need external support structures, you can design complex overhangs and free – floating features. But make sure they are well – connected to the main structure to prevent breakage during cleaning.
3. Hollowing Models
To save material and reduce weight, consider hollowing out your design. Include escape holes (usually 2 – 5 mm in diameter) to remove unsintered powder from the interior.
4. Clearances for Moving Parts
If your design has moving parts (like hinges or interlocking pieces), ensure enough clearance. For nylon materials, a gap of 0.3 – 0.5 mm is generally recommended.
5. Sharp Edges vs. Rounded Edges
Sharp edges can concentrate stress and may not sinter properly. Use fillets and rounded edges whenever possible to improve durability and printing accuracy.
Tips for Optimizing SLS Designs
Designing with SLS in mind can improve results and reduce production costs.
- Optimize for Strength and Weight: Use lattice structures or honeycomb patterns inside parts to reduce weight while maintaining strength. Tools like Fusion 360 and nTopology offer advanced topology optimization features.
- Consider the Printing Orientation: The orientation of your part in the build chamber affects its strength and surface quality. Place critical surfaces facing upward for a smoother finish.
- Account for Thermal Expansion: SLS printing involves high temperatures, which can cause thermal expansion and warping. Design with extra tolerances to compensate for these effects.
- Texturing and Aesthetics: Add surface textures to improve grip or enhance aesthetics. SLS can handle fine details well, so don’t be afraid to add intricate patterns.
Workflow: Preparing Your Model for SLS Printing
Once your design is ready, follow these steps to prepare it for printing:
- Check for Errors: Use software like Netfabb or Meshmixer to detect and fix mesh errors such as non – manifold edges and intersecting faces.
- Scale and Position: Ensure your model is correctly scaled and optimally positioned in the build chamber to maximize material usage and minimize print time.
- Slice the Model: Import the design into the SLS printer’s slicing software. Adjust layer thickness, laser power, and other print settings based on the material and printer specifications.
- Simulate the Print: Use the slicer’s simulation feature to preview the build process and identify potential issues before printing.
Common Mistakes to Avoid in SLS Design
Even experienced designers can make mistakes when working with SLS. Here are some pitfalls to watch out for:
- Ignoring Minimum Wall Thickness: Thin walls can lead to failed prints.
- Overcomplicating Internal Features: While SLS can handle complexity, overly intricate designs may trap powder or create weak points.
- Skipping Tolerances for Assemblies: Parts that need to fit together may not align properly if tolerances are too tight.
- Lack of Escape Holes: Hollow parts without escape holes can trap powder and become unusable.
Step – by – Step SLS Printing Projects: Hands – on Learning
Now that you understand the fundamentals of SLS 3D printing and design, it’s time for hands – on projects. These projects will guide you through different SLS printing tasks, providing detailed instructions and insights. Each project helps you apply what you’ve learned and explore the capabilities of SLS technology.
Project 1: Creating a Simple Functional Part
Overview
In this project, you’ll create a custom bracket to hold an item securely. It will give you practical experience with the entire SLS process, from design to post – processing.
Materials and Tools Needed
- SLS Printer (e.g., Formlabs Fuse 1 or EOS P 396)
- Nylon Powder (PA12 is recommended for its strength and flexibility)
- CAD Software (Fusion 360, SolidWorks, etc.)
- Post – processing tools (brushes, spatula, etc.)
- Safety gear (gloves and a mask for handling powder)
Step – by – Step Instructions
- Design the Bracket: Open your CAD software and create a new file. Design a simple bracket according to your requirements. Aim for a 1 – mm wall thickness and add fillets for strength. Save your design as an STL file.
- Prepare the Printer: Ensure your SLS printer is clean and properly calibrated. Load the nylon powder into the printer’s powder bed and set the printer parameters (layer thickness, laser power, etc.) according to the material specifications.
- Slice the Model: Import your STL file into the printer’s slicing software. Adjust any settings as needed and run a simulation to confirm the print will go as expected. Then, export the print file to the printer.
- Start the Print: Begin the printing process and monitor its progress. The print time depends on the complexity and size of the bracket, usually several hours.
- Post – Processing: Once the print is done, let the build chamber cool for a few hours. Carefully remove the part from the powder bed using a spatula. Brush away excess powder and check the part for defects.
- Final Touches: If desired, sand or finish the bracket for a smoother surface. Test the functionality of the bracket with the intended item.
Project 2: Designing a Complex Geometric Object
Overview
This project involves creating a decorative lamp shade with complex geometries. It will test your design skills and let you explore the aesthetic possibilities of SLS printing.
Materials and Tools Needed
- SLS Printer
- Nylon Powder or Flexible Material (e.g., TPU for a more organic feel)
- CAD Software
- Post – processing tools
Step – by – Step Instructions
- Design the Lamp Shade: In your CAD software, design a lamp shade with intricate patterns or geometries. Consider using lattice structures to reduce weight while maintaining its aesthetic appeal. Export your design as an STL file.
- Prepare the Printer: Follow the same preparation steps as in Project 1. Make sure your printer is calibrated and the correct powder is loaded.
- Slice the Model: Import the STL file into the slicing software. Ensure the orientation maximizes print quality. Use a finer layer thickness for better detail and run a simulation.
- Start the Print: Begin the printing process and wait for it to finish.
- Post – Processing: Once cooled, remove the lamp shade from the powder bed. Brush off excess powder, and use a soft cloth to clean delicate areas if necessary.
- Finishing Touches: If you want, paint or treat the lamp shade for a better look. Assemble the lamp with the necessary electrical components.
Project 3: Prototyping a Product
Overview
In this advanced project, you’ll prototype a custom bottle opener designed for ergonomics and usability. It will show how SLS can be used for functional prototypes.
Materials and Tools Needed
- SLS Printer
- Nylon Powder (for durability)
- CAD Software
- Post – processing tools
Step – by – Step Instructions
- Research and Design the Bottle Opener: Research the ergonomics of bottle openers. Design your opener in CAD, including features like a comfortable grip and a functional opening mechanism. Export the design as an STL file.
- Prepare the Printer: Ensure your printer is clean and calibrated, similar to previous projects.
- Slice the Model: Import the STL file into the slicing software. Adjust settings to optimize for strength and durability. Run a simulation to check for issues.
- Start the Print: Begin printing the bottle opener and closely monitor the progress.
- Post – Processing: After printing and cooling, remove the part from the powder bed. Brush off excess powder and check the opener for defects.
- Testing and Iteration: Test the functionality of the bottle opener. If needed, adjust the design based on your findings and repeat the printing process to create an improved version.
Troubleshooting Common Issues in SLS Printing
When working with Selective Laser Sintering (SLS) 3D printing, you may encounter challenges. Knowing how to troubleshoot these issues can save time, materials, and frustration. This section covers common SLS printing problems, their causes, and solutions.
Common SLS Printing Problems
1. Layer Adhesion Issues
Symptoms: Parts show visible separation between layers, have weak points, or crumble easily.
Potential Causes:
- Inadequate laser power or speed settings.
- Incorrect layer thickness settings.
- Poor powder quality (contaminated or not properly mixed).
Solutions:
- Adjust Laser Settings: Increase laser power or reduce the speed to ensure proper sintering of each layer.
- Check Layer Thickness: Try different layer thickness settings; thinner layers may improve adhesion.
- Use Fresh Powder: Always use high – quality, clean powder. Replace old or contaminated powder.
2. Warping and Distortion
Symptoms: Final prints are warped, twisted, or misshaped.
Potential Causes:
- Uneven cooling of the material.
- Improper part orientation in the build chamber.
- High residual stress in the material.
Solutions:
- Optimize Cooling: Allow the build chamber to cool gradually after printing. Avoid rapid temperature changes. For example, if you immediately expose the hot printed part to a cold environment, it can cause uneven contraction and lead to warping. Let it sit in the chamber for a sufficient amount of time to cool down slowly.
- Reassess Orientation: Reposition your part in the build chamber. Try to minimize overhangs and stress concentrations. You can use software simulations to determine the best orientation. For instance, if a part has a large flat surface, printing it with that surface parallel to the build platform might reduce warping.
- Design Considerations: Incorporate features like fillets and rounded edges into your design. These features can help reduce stress points. For example, instead of having sharp corners in a rectangular part, adding rounded corners can distribute stress more evenly during the printing and cooling process.
3. Uneven Surface Finish
Symptoms: Parts have rough surfaces, uneven textures, or inconsistent finish quality.
Potential Causes:
- Incorrect powder distribution or bed leveling.
- Inconsistent laser scanning speed.
- Poor quality or unsuitable powder.
Solutions:
- Check Powder Bed Leveling: Ensure that the powder bed is level and the powder is evenly distributed before starting the print. You can use a leveling tool provided by the printer manufacturer to check and adjust the bed. If the powder is not spread evenly, it can lead to areas with different densities, resulting in an uneven surface.
- Adjust Laser Scanning Speed: Experiment with different laser scanning speeds. A too – fast speed might not allow the powder to sinter properly, while a too – slow speed could cause over – sintering in some areas. Find the optimal speed that gives a smooth finish.
- Use Suitable Powder: Choose high – quality powders specifically designed for SLS printing. Some powders are formulated to provide better surface finishes. For example, powders with a more uniform particle size distribution can contribute to a smoother surface.
Tips for Effective Troubleshooting
- Document Everything: Keep a detailed log of your print settings, materials used, and any issues encountered. This log can be a valuable resource when trying to identify patterns. For example, if you notice that layer adhesion problems occur only when using a certain batch of powder or a specific set of laser power and speed settings, you can use this information to make targeted adjustments.
- Run Test Prints: Before starting a large – scale print, run smaller test prints. This allows you to fine – tune your settings and identify potential issues. For instance, if you’re planning to print a large number of parts, print a single test part first and analyze it for any defects.
- Consult Manufacturer Guidelines: Always refer to your SLS printer’s manual for recommended settings and troubleshooting advice specific to your model. The manufacturer has in – depth knowledge of the printer’s capabilities and limitations, and their guidelines can help you solve problems more effectively.
- Join Online Communities: Engage with SLS printing communities on forums and social media platforms. Sharing experiences and solutions with other users can provide valuable insights. For example, someone else might have encountered a similar problem and found an effective solution that you can try.
Maintenance Tips for Your SLS Printer
Regular maintenance is crucial for ensuring the longevity and performance of your SLS printer.
| Maintenance Task | Frequency | Description |
| Clean the Powder Bed | After each print | Remove excess powder and debris from the build chamber. This helps prevent powder from accumulating and affecting the printing process. Use a soft brush or a vacuum cleaner with a suitable attachment to clean the bed thoroughly. |
| Check Laser Optics | Monthly | Clean the laser lens and mirrors to maintain clarity. Dust or debris on these components can affect the laser’s performance, leading to issues like uneven sintering. Use a specialized lens cleaning solution and a soft, lint – free cloth to clean them carefully. |
| Inspect Mechanical Parts | Bi – monthly | Check for wear and tear on components like belts and bearings. Worn – out parts can cause inaccuracies in the printing process. Replace any parts that show signs of excessive wear or damage. |
| Update Software | As needed | Ensure your slicing software and printer firmware are up to date. Software updates often include bug fixes, performance improvements, and new features that can enhance your printing experience. |
Advanced Techniques in SLS Printing
Once you’ve mastered the basics of Selective Laser Sintering (SLS) and overcome common challenges, it’s time to explore advanced techniques. These techniques can take your SLS printing projects to the next level, improving print quality, functionality, and workflow efficiency.
Customizing Print Settings for Different Materials
SLS printing supports a wide range of materials, each with its own unique properties and requirements. Customizing print settings according to the material is essential for achieving optimal results.
1. Material – Specific Settings
Different materials require different settings for laser power, scan speed, and layer thickness.
| Material | Laser Power | Scan Speed | Layer Thickness | Notes |
| Nylon (PA12) | 15 – 20 W | 100 – 200 mm/s | 0.1 – 0.15 mm | Versatile, suitable for functional parts. For example, when printing a mechanical component, these settings can ensure proper sintering and good mechanical properties. |
| Nylon (PA11) | 10 – 15 W | 80 – 150 mm/s | 0.1 mm | Biodegradable and slightly flexible. These settings are optimized to maintain its flexibility while ensuring proper fusion of the powder. |
| Glass – Filled Nylon | 20 – 25 W | 80 – 150 mm/s | 0.1 mm | Has increased rigidity, making it ideal for structural parts. The higher laser power is needed to sinter the glass – filled powder effectively. |
| Metal Powders | 30 – 50 W | 50 – 100 mm/s | 0.05 – 0.1 mm | Requires precise settings for sintering. The high laser power is necessary to melt the metal powder, and the slower scan speed helps in achieving proper fusion. |
2. Conducting Material Tests
Before starting a large – scale print with a new material, perform small test prints. This allows you to fine – tune the settings for that specific powder. For example, if you’re using a new brand of nylon powder, print a small test piece with different combinations of laser power, scan speed, and layer thickness. Analyze the results to determine the optimal settings.
3. Adjusting for Environmental Conditions
Ambient temperature and humidity can affect powder behavior. For example, high humidity can cause the powder to absorb moisture, which may lead to poor sintering. Keep your printing environment controlled to ensure consistent results. Use a dehumidifier in humid conditions and maintain a stable temperature in the printing area.
Post – Processing Techniques
Post – processing is a crucial step in SLS printing that can significantly enhance the appearance and functionality of your printed parts.
1. Cleaning
- Powder Removal: Use soft brushes to remove excess powder from your part. For parts with intricate designs, compressed air or a gentle vacuum can be more effective. For example, if you’ve printed a part with small internal cavities, compressed air can reach into those areas and blow out the powder.
- Ultrasonic Cleaning: For highly detailed parts, an ultrasonic cleaner can be used. It effectively removes residual powder without damaging the surface. The ultrasonic waves create vibrations in a cleaning solution, which helps dislodge the powder particles.
2. Sanding and Smoothing
- Manual Sanding: Use fine – grit sandpaper to smooth rough surfaces. Start with coarser grit sandpaper to remove larger imperfections and then progress to finer grits for a polished finish. For example, if the printed part has visible layer lines, start with 120 – grit sandpaper and then move to 400 – grit or higher for a smoother look.
- Chemical Smoothing: Some materials can be smoothed using chemical solvents. However, be cautious and ensure that the solvent is compatible with the material. For instance, certain plastics can be chemically smoothed using acetone, but this method is not suitable for all materials.
3. Surface Treatments
- Painting: Apply paint or coatings to enhance the aesthetics and add color to your parts. Make sure the surface is clean and dry before painting. For example, if you’re painting a decorative item, a smooth, clean surface will ensure better paint adhesion and a more professional look.
- Coatings: Consider applying a protective coating like epoxy or polyurethane to improve durability and resistance to wear. This is especially useful for parts that will be used in harsh environments or experience frequent handling.
4. Assembly and Functional Enhancements
- If your part consists of multiple components, use adhesives or mechanical fasteners to assemble them. You can also add features like rubber grips or inserts for enhanced functionality. For example, if you’ve printed a tool handle, adding a rubber grip can improve the user’s hold and comfort.
Scaling Up Your SLS Projects
As you become more proficient in SLS printing, you may want to scale up your projects for larger production runs or more complex designs.
1. Batch Printing
- Optimize Build Layout: Arrange multiple parts in the build chamber to maximize space and minimize powder waste. Use software to help visualize the optimal layout. For example, if you’re printing small parts, you can arrange them in a honeycomb – like pattern to make the most of the available space.
- Use the Same Material: When printing multiple parts simultaneously, ensure they are made from the same material. This avoids complications that can arise from different print settings for different materials.
2. Design for Manufacturability
- Consider how your design can be modified for easier production. Simplifying geometries or reducing the need for post – processing can make large – scale production more feasible. For example, if you have a design with very complex internal structures that require extensive post – processing to remove powder, you might simplify it to make the production process more efficient.
3. Automate Your Workflow
- If you frequently print the same components, consider automating parts of your workflow. Use scripts for slicing or set up a more efficient process for cleaning and finishing. For example, you can write a script that automatically slices your models with the correct settings, saving you time and reducing the risk of human error.
4. Invest in Upgraded Equipment
- As your needs grow, it may be worth investing in a more advanced SLS printer. A higher – throughput printer with better capabilities can enable faster production and improved quality. For example, a printer with a larger build volume can accommodate more parts in a single print, increasing your productivity.
Conclusion: Key Takeaways and Future Directions in SLS 3D Printing
As we conclude this comprehensive guide to Selective Laser Sintering (SLS) 3D printing, it’s important to review the key points and consider the future of this innovative technology. SLS is a powerful tool for creating complex geometries, functional prototypes, and high – quality end – use parts. With the knowledge and skills gained from this guide, you’re well – prepared to start your SLS printing journey.
Key Takeaways
1. Understanding the SLS Process
- SLS is an additive manufacturing technique that builds parts layer by layer by fusing powdered materials with a laser. This process enables the creation of intricate designs and functional parts.
- Each stage of the SLS process, from powder bed preparation to post – processing, is critical for successful prints. For example, proper powder bed leveling is essential for consistent layer deposition, and effective post – processing can enhance the part’s appearance and functionality.
2. Designing for Success
- Design plays a vital role in SLS printing. Following design guidelines such as appropriate wall thickness overhang, considerings, and planning internal structures is crucial for printability and functionality.
- Using CAD software effectively to create optimized models that meet the unique requirements of SLS technology is an important skill. For instance, CAD software allows you to simulate the printing process and identify potential design flaws before printing.
3. Hands – on Experience with Projects
- Engaging in practical projects, like creating functional parts, complex geometries, and prototypes, provides valuable experience. It helps you understand the capabilities and limitations of SLS printing.
- Each project is a learning opportunity. For example, when prototyping a product, you can test different design features and materials to find the best combination for your needs.
4. Troubleshooting Challenges
- Being familiar with common SLS printing issues, such as layer adhesion problems, warping, and uneven surface finishes, allows you to address challenges effectively.
- Regular printer maintenance and documenting your printing process can lead to continuous improvement in your prints. For example, if you keep a log of your print settings and the resulting print quality, you can quickly identify and fix issues in the future.
5. Advanced Techniques for Enhancement
- Customizing print settings based on material properties, using effective post – processing methods, and scaling up projects are important skills for maximizing the potential of SLS.
- Experimenting with different materials and advanced techniques can lead to innovative applications and improved product performance. For example, trying out new composite materials can open up new possibilities for creating stronger and lighter parts.
Future Directions in SLS 3D Printing
Looking ahead in your SLS printing journey, consider these trends and developments shaping the future of the technology.
1. Material Innovation
- The development of new powders, including composites and biocompatible materials, will expand the range of applications for SLS printing. Stay informed about emerging materials that could enhance your projects. For example, new biocompatible powders could open up opportunities in the medical field for printing customized implants.
2. Integration with Other Technologies
- Combining SLS with other manufacturing technologies, such as injection molding or CNC machining, can create hybrid solutions. These solutions leverage the strengths of each method. For instance, SLS can be used for creating complex prototypes, and injection molding can be used for large – scale production of the final product.
- Integrating SLS with digital design tools and automation can streamline workflows and increase productivity. For example, using artificial intelligence – based design tools to optimize SLS models for faster printing.
3. Sustainability Practices
- As sustainability becomes more important in manufacturing, SLS printing offers opportunities. Powder recycling reduces waste, and creating lightweight structures minimizes material usage.
- Consider incorporating sustainable practices into your SLS projects, such as using biodegradable materials or reducing energy consumption. For example, if you’re printing a consumer product, choosing a biodegradable material can make it more environmentally friendly.
4. Community and Collaboration
- Engage with the growing community of SLS enthusiasts, professionals, and researchers. Online forums, maker spaces, and industry events are platforms for sharing knowledge and collaborating on projects.
- Participating in workshops and training programs can enhance your skills and keep you updated on the latest advancements in SLS technology. For example, attending a workshop on advanced SLS post – processing techniques can teach you new methods to improve the quality of your prints.